Pro is the same studio as Simple, opened up. In Simple you pick a style and move three or four controls; in Pro you see everything behind it: the tuner, each effect in order, the timeline with your takes and the mixer. This page goes through the screen from top to bottom.
If you’d rather have the app show you, go to Settings → Help → Pro tour.
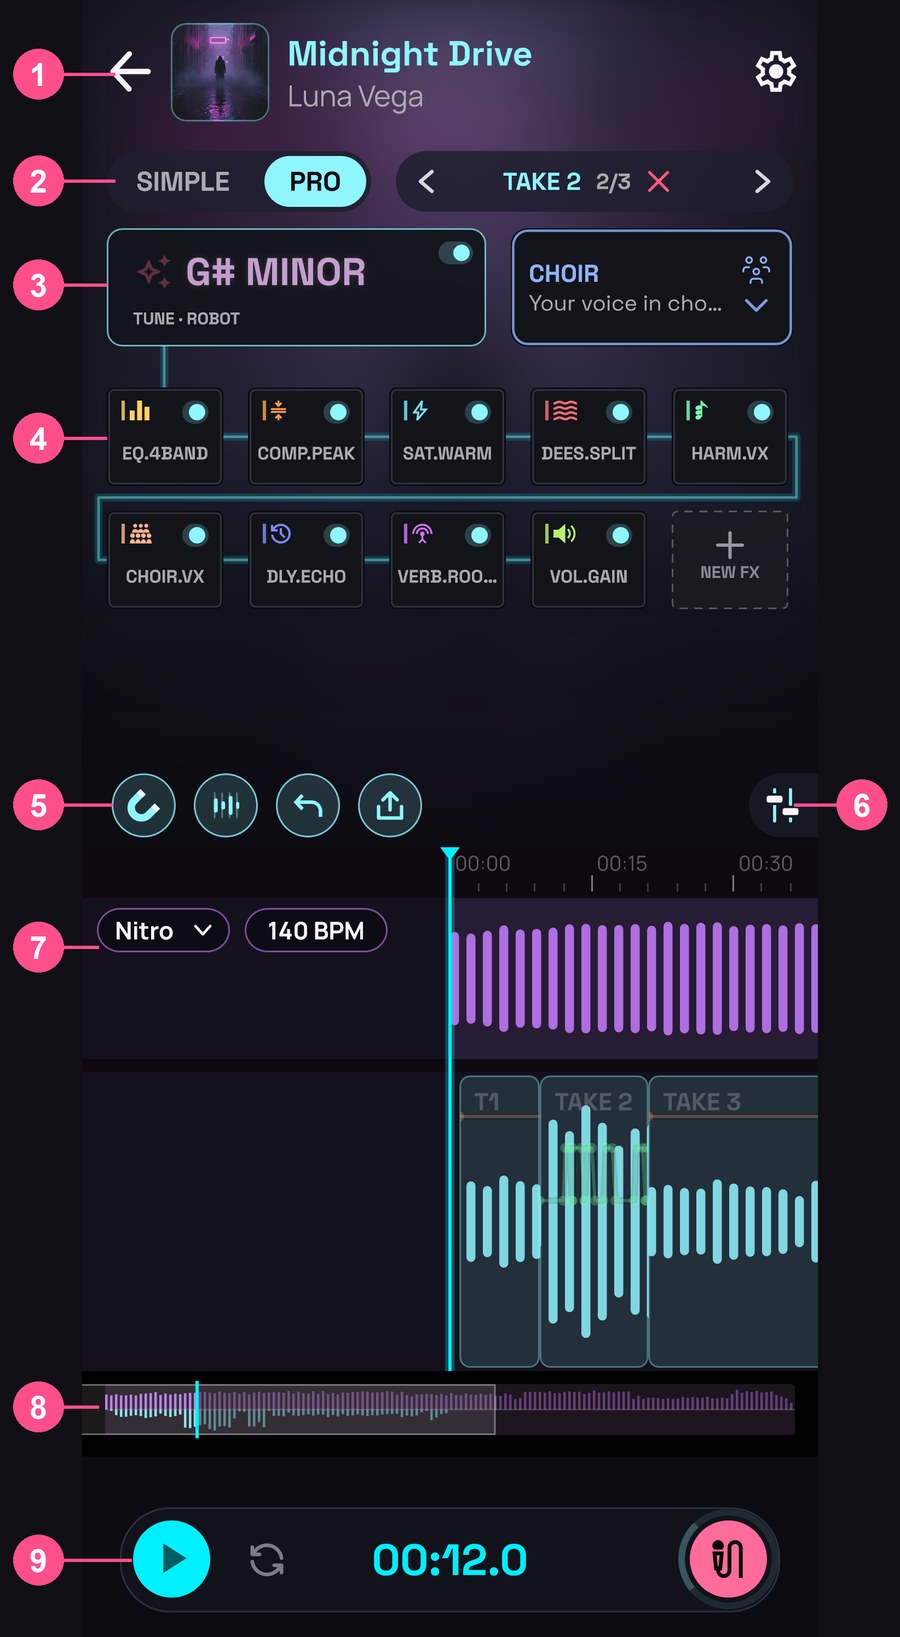
- The header: Library, cover, song name and Settings.
- The Simple | Pro switch and the take stepper.
- The tuner card and, on its right, the style picker.
- The effects grid, in the order they play.
- The tools row: snap to beat, Beat Lock, undo and share.
- The mixer tab.
- The timeline: the beat lane with its chips and, below it, the voice lane with your takes.
- The whole song in miniature, to jump to any point.
- The transport: play, loop, the time and the record button.
Below, each part in detail.
Simple | Pro
The Simple | Pro switch, at the top left, changes mode. The middle of the screen changes; the header, the take stepper and the transport stay the same. Your song doesn’t change: it’s the same song, seen another way. VRaptor remembers the mode for next time.
When you switch to Simple, whatever you had open in Pro closes (an effect’s panel, the mixer, the curve editor) and the picked take is let go.
The header
From left to right:
- ‹: back to the Library.
- The cover: tap it to pick another one. On the Use your own card you can pick a photo from your gallery (Select image) or, on phones that allow it, take a new one with the camera button.
- The song’s name: tap it to change it. Below it, the artist (or Add artist): tap it to type it in.
- The gear: opens Settings.
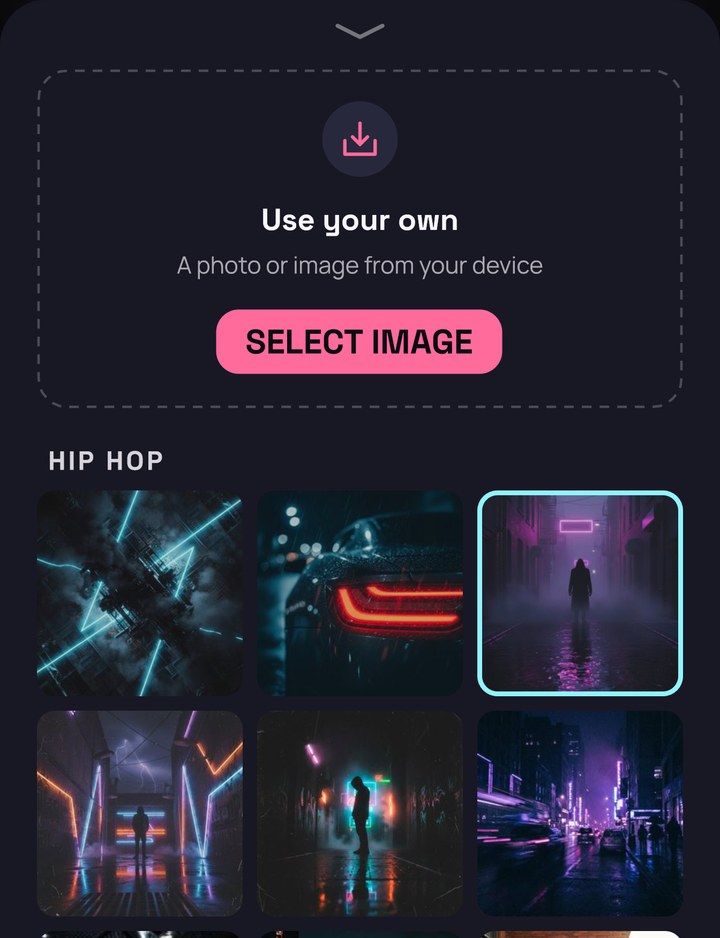
Below, on the right, is the take stepper (‹ TAKE 3 2/3 × ›). Everything you change at the top of Pro applies to the take it shows. See Takes.
The tuner card
The big card on the left is the tuner. It’s always the first thing your voice goes through, and it can’t be moved or removed.
- The key your voice is tuned to (for example, A MINOR). If the detection icon is lit in front of it, it’s working it out from what you sing.
- Below it, TUNE · and how hard it tunes: NATURAL, TIGHT or ROBOT. TUNE · OFF if it’s switched off.
- The switch, at the top right, turns it on and off. Tap the corner: you don’t need to hit the small switch exactly.
- MATCH BEAT, at the bottom right, appears when the tuner isn’t in the beat’s key. Tap it and your voice is tuned to the beat’s key.
- Tap the card to open the tuner’s panel.
All of this is explained in The tuner.
The style picker
To the right of the tuner is the take’s style: its name, its short description and its icon, with an arrow below. If you’ve changed something by hand, it says Custom · Your own sound. If you’re trying a Premium style, it has a padlock.
Tap it to open the list:
- All of VRaptor’s styles, in the same order as in Simple, each with a sentence saying how it sounds. Premium ones have a padlock, but you can try them on your takes all the same: you only need Premium to export.
- Below, CUSTOM PRESETS: the styles you’ve saved yourself, and the Save and Update options. See Custom presets.
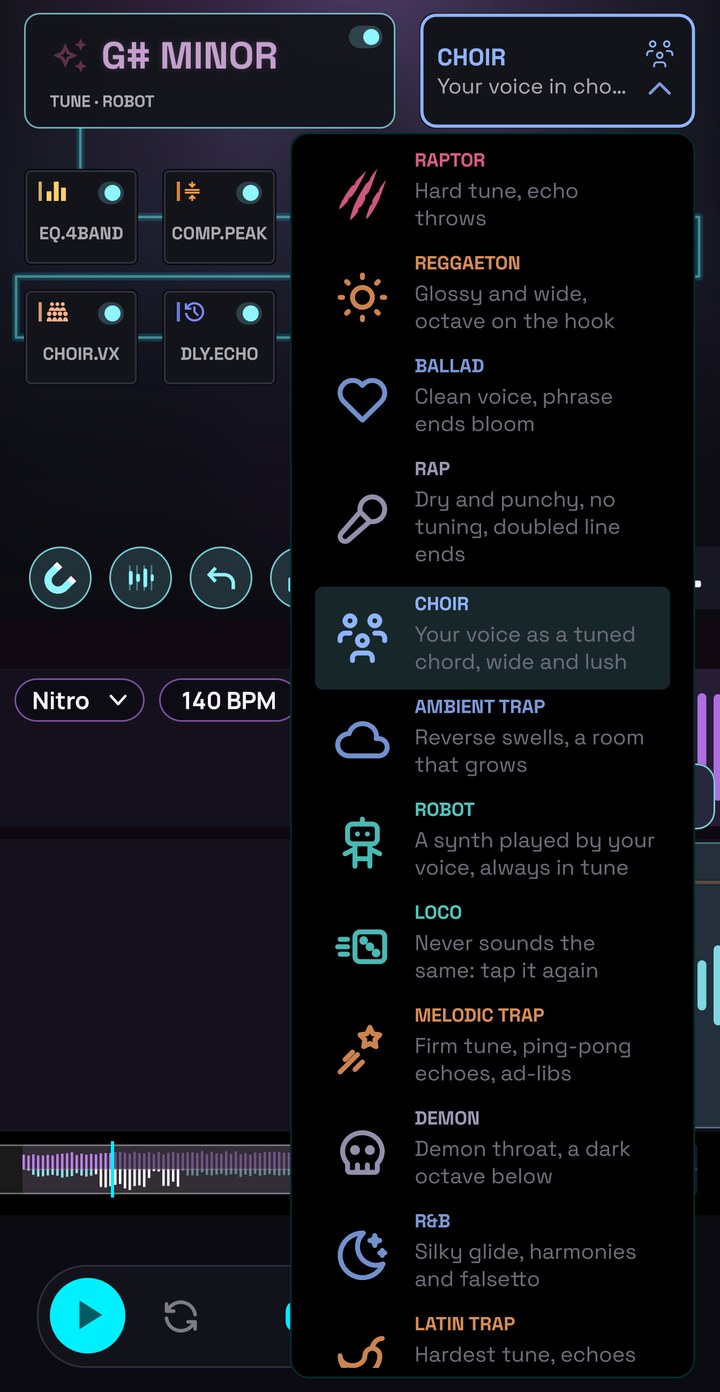
When you pick a style, the take changes sound, but keeps its key: the style doesn’t touch the key you’re tuning to. If you pick LOCO, you get a different combination every time you pick it: tap it again for another.
Picking a style can be taken back with Undo.
The effects
Below the tuner is the effects grid: five per row, in the order your voice goes through them (left to right and top to bottom, after the tuner). A line joins them in that order. The order matters: a reverb before a distortion doesn’t sound the same as after it.
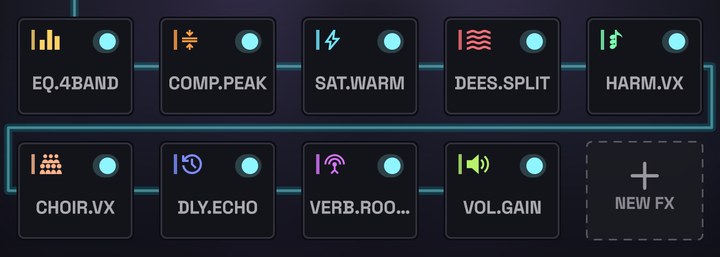
Each effect is a card with its icon, a strip in its colour, its short name (for example, VERB.ROOM or DLY.ECHO) and a switch in the top right corner.
- Tap an effect to open its panel. The panel slides down from the top with all its values. Tap another effect to switch panels; tap the same one, the arrow at the bottom of the panel, or swipe it up to close it. Each effect is explained in Effects.
- Tap the switch corner to turn it on or off without opening it. When it’s off, the card turns grey.
- Hold an effect for half a second: it lifts up and the grid appears. Drag it to another slot to change the order.
- Drag it off the grid to remove it: it turns red. When you let go, it’s gone. If you change your mind before letting go, bring it back into the grid.
- NEW FX, the slot with a + after the last effect, opens the list of effects with a sentence about each one. Tap one and it’s added to the end of the chain.
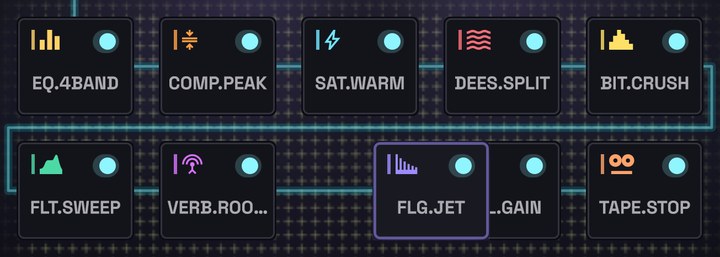
There’s room for 15 effects, plus the tuner. With 15, NEW FX disappears.
If the phone can’t keep up, you’ll see Audio is breaking up: “Too many effects for this phone. Try removing or turning off some.”
Changes to the effects (values, adding, removing, reordering) can’t be taken back with Undo. And as soon as you touch something by hand, the style becomes Custom. If you like how it turned out, save it in Custom presets.
The tool row
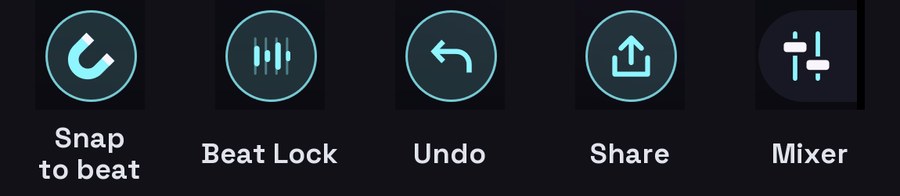
Above the timeline there are four round buttons and, at the right edge, the mixer tab.
| Button | What it does |
|---|---|
| Magnet (Snap to beat) | When it’s on, moving a take goes one beat at a time, and when trimming the edges go to quarters of a beat. It looks dimmed if the beat has no known tempo. It applies to every song and VRaptor remembers it. |
| Bars over lines (Beat Lock) | Fixes every take onto the beat. It asks first. See Takes. |
| Curved arrow (Undo) | Takes back the last edit to takes or style. |
| Up arrow (Share) | Exports the song as video or audio. See Export. |
In Simple there are only Undo and Share.
The mixer
The tab with two faders, at the right edge, opens the mixer. It slides in from the right next to the timeline, so you can still see the song while you mix. It’s only in Pro.
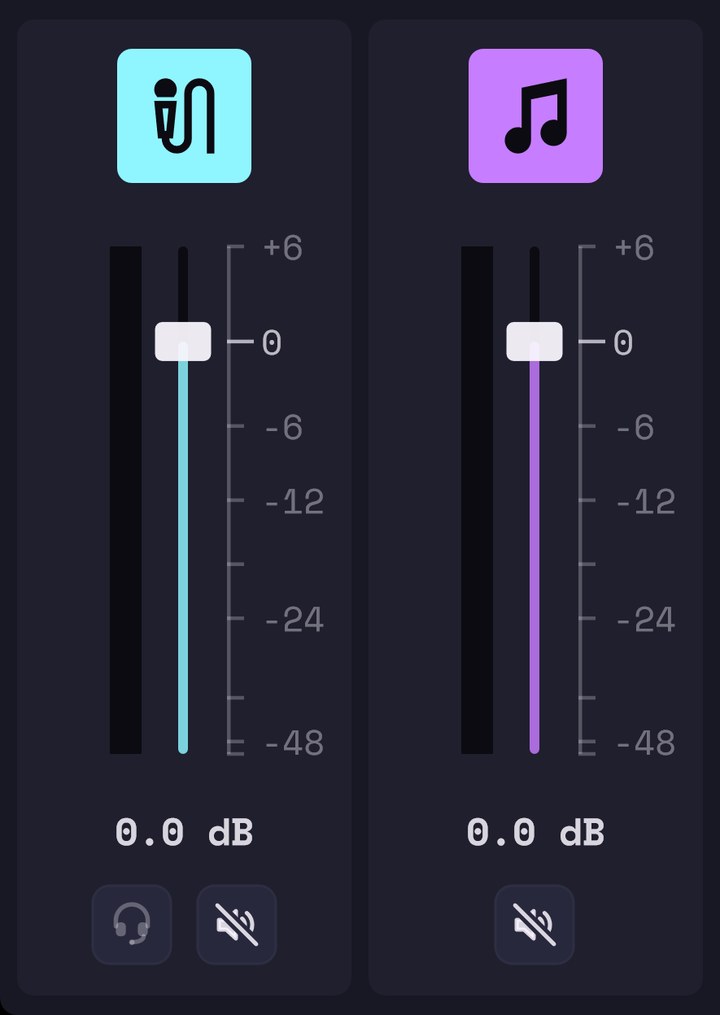
There are two strips, VOICE and BEAT. Each one has:
- A meter that moves with the sound.
- A volume fader, from silence to +6 dB. Double-tap the fader to go back to 0 dB.
- Mute (the crossed-out speaker). When muted, the strip turns grey.
The voice also has the monitor button (the headset with a mic): turn it on to hear yourself while you record. It only works with headphones; without them you’ll see Monitoring needs headphones.
The mix is saved with the song and is the one used when you export. To close it, tap the tab again or tap outside it.
If you record without headphones with the BEAT muted, VRaptor doesn’t remove the beat from that take, because it didn’t play.
The timeline
Below is the whole song, from left to right:
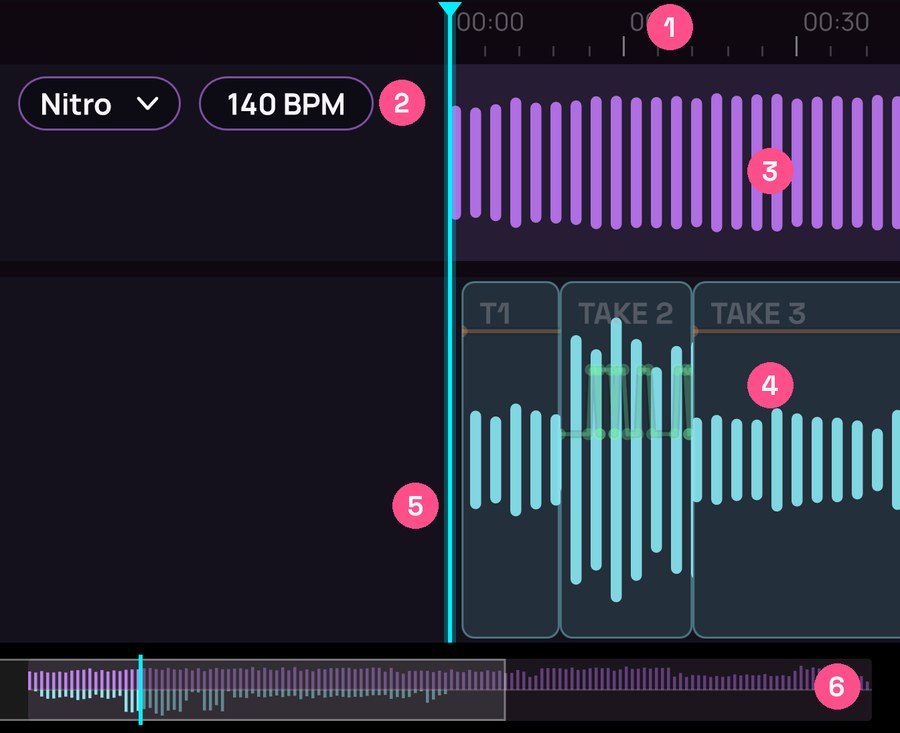
- The ruler, at the top, with minutes and seconds.
- The beat’s chips: the beat’s name with an arrow (tap it to pick another one, see Beats and key) and its tempo in BPM.
- The beat lane, with the beat’s waveform.
- The voice lane, with your takes (TAKE 1, TAKE 2…). Each take’s automation curves are drawn over it. If there aren’t any takes yet, it says Tap the mic to record.
- The playhead, fixed in the centre: it’s the song that moves.
- The strip at the bottom: the whole song in miniature.
How to get around:
- Drag left or right to move forward or back. If it’s playing, the song pauses while you drag and carries on when you stop. You can fling it with a quick swipe.
- Pinch with two fingers to zoom in or out.
- The strip at the bottom is the whole song in miniature: the beat upwards, the voice downwards, and a box with the part you’re looking at. Tap or drag on it to jump to any point.
And to work with takes:
- Tap a take to pick it; its toolbar appears above it (trim, automate, copy, delete).
- Hold a take to move it.
All of this, step by step, in Takes.
The transport
At the very bottom, as in Simple:
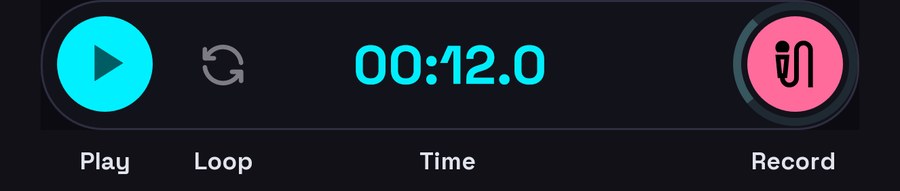
- Play / pause.
- Loop: off, song or one take (see Takes).
- The song’s time.
- The red mic button, to record, with the level ring (see Recording).
Next
← 5. Takes → 7. The tuner: the key, the scale and each of the tuner’s controls.